My studying notebook

Showing posts with label Blogger. Show all posts

2009/11/07

Rearrange Blogger Template Related Post & Add New Features

11/07/2009 10:42:00 PM Posted by Unknown , 1 comment

Today i spent few time to modify Blogger template like:

  • Rearrange related posts code.
  • prettyprint code syntax highlight.
  • Adding FancyBox lightBox and modify new.

I will keep on arranging my Blogger template and help it can more friendly. There had three parts on the above list. Second list is google code pretttify. I change my code syntax from syntaxhighligher to google-code-prettify. Google-code-prettify is using easier than syntaxhighlighter. You can just include two file(prettify.js & prettify.css) add function to execute prettify. Done!! Third list is FancyBox lightBox jQuery plugin. If you are familiar with jQuery. I think it's easy to add that plugin to your web page. About first list is what i want to share how do i arrange the Related Posts.

Related Posts

Until now, Blogger haven't support related posts in your blogger template. If you want to add that feature, you have to modify some template code and add few javascript function to do that.

Scenario

How does related posts work? The scenario is easy to understand. When you want to write new post, you will add Labels for this post on the bottom of Blogger editor. You add tags for the post you wrote. When web user visit your blog, related posts feature will list other relation posts following post content by specific tag. (you have three types can show related posts on your blog depending Blogger template pageType: 'item', 'archive', or 'index').[1]

<b:if cond='data:blog.pageType == &quot;item&quot;'>
<script expr:src='&quot;/feeds/posts/default/-/&quot; + data:label.name + &quot;?alt=json-in-script&amp;callback=RelatedLabels&amp;max-results=10&quot;'
type='text/javascript'>
</script>
</b:if>

I want to show related posts in user view specific page. So, i assign pageType is 'item'. As you can see. you can receive specific tag post content by callback function using Google Data Protocol[2]. Following is complete code to get all tage you add.

<b:loop values='data:post.labels' var='label'>
<!-- Fixed for Related Posts -->
<b:if cond='data:blog.pageType == &quot;item&quot;'>
<script expr:src='&quot;/feeds/posts/default/-/&quot; + data:label.name + &quot;?alt=json-in-script&amp;callback=RelatedLabels&amp;max-results=10&quot;'
type='text/javascript'>
</script>
</b:if>
</b:loop>

Finial, you need to render those data to web page. You can have simple function to do that like this.

After solving how receive data from Blogger template Layout data and render to web page. The key point of Related posts is parse data you need.

We receive Blogger template Layout data by callback function and return JSON data. The render data include post url, post title and post date (depending what you need). It's better to keep value in an object. Object is easier to understand and manipulate.

function RelatedLabels(json) {
var entries = json.feed.entry;
for (var key in entries) {
if (entries[key]) {
var item = {};
item.title = entries[key].title.$t;
item.url = entries[key].link[4].href;
item.date = entries[key].published.$t.substr(0, 10);
relatedPosts.push(item);
}
}
}

You might add multiple tags in different posts, and therefore might receive the same post in different tag by loop. There are many solutions to solve duplicate post in an object.

I push related post in one object. We can extend Array.prototype.push() function to detect should we add this post to our object. If you are familiar with Javascript syntax. It's simple to manipulate DOM using Javascript like document.write(). If you concern web page performance, you should decrease manipulate DOM directly[3]. Following is complete code.

var relatedPosts = [];
relatedPosts.push = function (data) {
var _push = true;
var length = this.length;
for (var i = 0; i < length; i++) {
if (this[i].url == data.url) _push = false;
}
if (_push) return Array.prototype.push.call(this, data);
else return this;
}

function RelatedLabels(json) {
var entries = json.feed.entry;
for (var key in entries) {
if (entries[key]) {
var item = {};
item.title = entries[key].title.$t;
item.url = entries[key].link[4].href;
item.date = entries[key].published.$t.substr(0, 10);
relatedPosts.push(item);
}
}
}

function ShowRelatedPosts(PostUrl) {
var count = 0;
var eleLi, link, date, fragment = document.createDocumentFragment();
for (var key in relatedPosts) {
if (typeof(relatedPosts[key].url) != 'undefined' && relatedPosts[key].url != PostUrl && count < 5) {
eleLi = document.createElement('li');
link = document.createElement('a');
date = document.createTextNode(' (' + relatedPosts[key].date + ')');
link.setAttribute('href', relatedPosts[key].url);
link.innerHTML = relatedPosts[key].title;
eleLi.appendChild(link);
eleLi.appendChild(date);
fragment.appendChild(eleLi);

count++;
}
}
var eleOl = document.createElement('ol');
eleOl.appendChild(fragment);
document.getElementById('relatedPosts').appendChild(eleOl);
}
reference

2009/10/07

BambooBig.blogspot.com LiveDemo Gallery

10/07/2009 09:08:00 PM Posted by Unknown 3 comments

Few days ago. I spent few time to change 竹部落 (bamboobig.blogspot.com) a new blog template. I hope new template can decrease browser page loading time. Cause the loading preference, i took off few javascript blocks like Anobii (my bookcase in Anobii), etc.

After modifying my new template. I build a demo gallery (BambooBig.blogspot.com LiveDemo Gallery) by Google App Engine. I will put all new blog post live demo in here. Sure, i will transfer 竹部落 (bamboobig.blogspot.com) exist post had live demo to here too. I hope that demo gallery could let you guys to understand what i said in my blog post easier.


link

2009/01/08

Audio Player Wordpress Plugin Wizard

1/08/2009 10:57:00 PM Posted by Unknown , , , 1 comment
Google like Audio Player WordPress Plugin Wizard

Background:

In my another blog www.cage1016.blogspot.com. I wrote a post about a mobile answer tone 別別掛. The point is i found many audio(mp3) players that i can embed mp3 in my blog easily. Final, i found a post Inline Mp3 Player(WordPress version) and talk about a simple inline audio player. It's Audio Player Wordpress plugin. The audio player support you can setting simple options to change the look of palyer. for example: background color, Text color, enable auotplay and enable loop play.


<object id="audioplayer1" height="24" width="290" data="http://cage.chung.googlepages.com/player.swf" type="application/x-shockwave-flash">
<param value="http://cage.chung.googlepages.com/player.swf" name="movie"/>
<param value="playerID=2&bg=0xCDDFF3&leftbg=0x357DCE&lefticon=0xF2F2F2&rightbg=0xF06A51&rightbghover=0xAF2910&righticon=0xF2F2F2&righticonhover=0xFFFFFF&text=0x357DCE&slider=0x357DCE&track=0xFFFFFF&border=0xFFFFFF&loader=0xAF2910&soundFile=xxxx" name="FlashVars"/>
<param value="high" name="quality"/>
<param value="false" name="menu"/>
<param value="#FFFFFF" name="bgcolor"/>
</object>


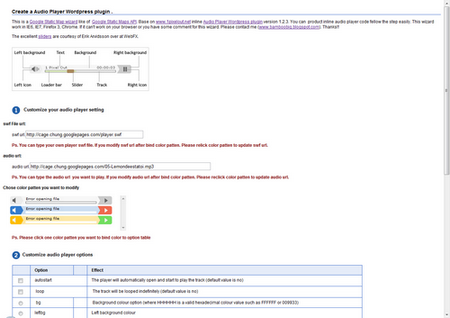
Above code is the audio player plugin syntax. we can see that there are few options are relative to Color bg, leftbg etc. It's a little difficult to setting these color to product a beautiful look. Or if you don't real understand the html color hex code. I think that the best way is you can change the option color directly. And few ago, when i studied Google Static Map API. In button of Static Maps API Developer's Guide has a firendly wizard(Goolge Static Map Wizard) support a simple UI-dirven way to generate static maps via a simple UI interface.

So, i wirte some javascript to support a similar simple UI-dirven way to generate Audio Player Wordpress Plugin. Just 3 steps and few settings. You can get the beautiful audio player.

Explain:

The Audio Player WordPress Plugin Wizard is Google style like. Build All by whole javascript and use excellent sliders are courtesy of Erik Arvidsson over at WebFX. The simple UI-dirven way let you can build your player look easily and only 3 steps.

Audio Player Color Schema:

As you can see. There are 9 color you can change.

Step1: Customize your audio player setting


First, you have 3 things to do. Choose the Audio Player Plugin play.swf url and choose the auido file url you want to embed in your blog (This 2 items have default, if you want test first and don't mind it). Then, there are 3 color schema patten. Choose one and you will see the colors bind to table of step2.

Step2: Customize audio player options of colors, autoplay and loop


After the color schema binded. I set autoplay and loop field are ture. If the player url and audio file url are current. Now you will listen to the music. In this step, you can change the color of palyer you want. Click the ratio button of option column. The color picker will be setting to equal the option color you click. You can change the color by darp the red, green and blue or type the html color hex code directly. The player will update if you any change the color, autoplay, loop setting and.

step3:Generate audio player embed code


Now, you can copy this code to embed in you blog.

enjoying~~~


2009/01/02

Feed media:thumbnail Item

1/02/2009 10:22:00 PM Posted by Unknown , 1 comment

In my early two posts(I,II). I talk about Blogger in Draft new features, the Geotagging. There are many blogger discuss the new feature in comments of New feature: Geotagging by Blogger In Draft. Now, maybe you don't understand that this post i will talk about feed item and why i will remind it.

If you had read the post of blogger draft new feature. You will notice that the author offer a Gagdet(here). It's add a google map in you blogger that parser feed georss:point data of your post feed. And i found Blogger Developers Network announced a feature about media:thumbnail(here). It's talk about you can get a 72x72 pixel image in your feed if you add first image in your post. Those give me a idea. I modify my blog template that just list the post if you click the older post link in the footer of blog.
<b:if cond='data:blog.pageType == &quot;index&quot;'>
<!-- Show article title only -->
<div class='thumbnail_'>
<table>
<tr>
<td>
<script expr:src='&quot;/feeds/posts/default/&quot; + data:post.id + &quot;?alt=json-in-script&amp;callback=GetThumbnail&quot;'
type='text/javascript'>
</script>
</td>
<td>
<h3 class='post-title' id='list-title'>
<a expr:href='data:post.url'>
<data:post.title/>
</a>
<h2 class='date-header'>
<data:post.dateHeader/>
</h2>
</h3>
</td>
</tr>
</table>
</div>
<b:else/>
<b:include data='post' name='post' />
</b:if>


function GetThumbnail(json) {
var url = (typeof(json.entry.media$thumbnail) != 'undefined') ? json.entry.media$thumbnail.url : &quot; & quot;
if (url.length & gt; 0) document.write('&lt;img src=\&quot;' + url + '\&quot;/&gt;');
else document.write('&lt;img src=&quot;https://blogger.googleusercontent.com/img/b/R29vZ2xl/AVvXsEhsPeUmlIKKTCkO4u4w42SdR4ph9rwh6IgI53ESBC232pBzD8nlNbOZdUk-P5KtJh73TLP_fRMU_HR3CIY-vNDYriqFSfX2un2HH-mKa_w-iChRdLCYoCU3n0rbEPcfOOHMPdyxMxIkQyc4/&quot; /&gt;');
}

The above code. javascript code pass one feed by pass data:post.id and execute callback functionGetThumbnail to write the image url.

get your blogger thumbnail←←


2008/12/13

Blogger in Draft New feature: Geotagging Test II

12/13/2008 12:48:00 PM Posted by Unknown , 2 comments
http://bloggerindraft.blogspot.com - announce a new feature about goetagging. You can add a location to descirbe your post. The geotags give your reader a way to understand what are you want to say exactly. It's easy to use this new feature.
  1. login into http://draft.blogger.com
  2. click the add location link below the main text field. You can use editor to search, drap ect.
This is the simple step and there has more detail explain how to use new feature. When you add location in post. That's mean you can get some geo information in post.


Layouts Data Tags Type Value
data:top.showLocation bool true or false
data:post.location bool true or false
data:post.location.mapsUrl text google map url
data:post.location.name text display name

There's new four blogger Layouts Data Tags in upon image and list. Then, we can modify our template to add a url of the Google map site links. You can add this url link in one of three of post footer.

<p class='post-footer-line post-footer-line-1'>here</p>
<p class='post-footer-line post-footer-line-2'>here</p>
<p class='post-footer-line post-footer-line-3'>or here</p>

Then, modify template code like that

<div class='post-footer-line post-footer-line-1'>
<span class='post-location'>
<b:if cond='data:top.showLocation'>
<b:if cond='data:post.location'>
<data:postLocationLabel/>
<a expr:href='data:post.location.mapsUrl' target='_blank'><data:post.location.name/></a>
</b:if>
</b:if>
</span>
</div>

Now, you have done in post footer to add google map url link.

http://bloggerindraft.blogspot.com announce another Gedget(http://blogmap-gadget.googlecode.com/svn/trunk/blogmap.xml) that will display your posts on a map by javascript parsing blog feed. So, there is a few known issuse descript by Blogger in Draft.

one of upon know issue is the geotag cannot be removed from a post once it has been saved. If you need to remove a geotag, please copy your post content into a new post and delete the geotagged post. I think that everybody will think it isn't very friendly. It's more to suit people who like the travel blogger. i don't use this new feature every time i write new post. Sometime, i will add extra information to help reader to understand the post by use Google Static Maps API. It's a easy way to display what i say.
So, i modify the blogger template again to add a image by Google Static Maps API in post footer.

<p class='post-footer-line post-footer-line-1'>
<b:if cond='data:top.showLocation'>
<b:if cond='data:post.location'>
<div class='post-labels'>
<data:postLocationLabel/>
</div>
<div id='post-geo'>
<script src='http://cage.chung.googlepages.com/Geotagging1.0.js' type='text/javascript'/>
<script type='text/javascript'>
var mapurl = &#39;<data:post.location.mapsUrl/>&#39;;
var size = &quot;450x220&quot;;
var maptype = &quot;roadmap&quot;; // roadmap(Default),mobile,satellite,terrain,hybrid
var markerColor = &quot;green&quot;; //black, brown, green, purple, yellow, blue, gray, orange, red, white
var markerChar = &#39;m&#39; //[a-z, 0-9]
var Key = MAPS_API_KEY;
var sensor = false;

BuildStaticMap(mapurl, size, maptype, markerColor, markerChar, Key, sensor);
</script>
</div>
</b:if>
</b:if>
</p>


This way is right to work. but, i don't know how to get the geo point data directly. now ,i must parse the to get the latitude, longitude and zoom value. When i parse the location map url. The zoom value always equal to 10. In fact, there are few method to solve this problem. I can use Google Maps API instead of Google Statics Maps API. It's making thing more complicate probably.

2008/08/22

Add Star Ratings to your Blogger Blog

8/22/2008 10:15:00 PM Posted by Unknown 1 comment
Blogger in draft support new Star Ratings feature, blog readers can hit rate easily of your post. To enable star ratings, login to
http://draft.blogger.com/ dashboard and go to blog layout page. Click "Edit" botton at Page Elements and selected the "Show Star Ratings".

Modify Blog Template

After enable new Star Rating feature, we must add few code to show star rating where you want.

1.decide a place to show star ratings. For example, to show star ratings in every post footer. Choice one of three paragraph
<div class='post-footer'>
<p class='post-footer-line post-footer-line-1'></p>
<p class='post-footer-line post-footer-line-2'></p>
<p class='post-footer-line post-footer-line-3'></p>
</div>

2.Add following section of codes
<b:if cond='data:blog.pageType == &quot;item&quot;'>
<!-- Add above code, show star rating at single post view, if you don't.
delete it and don't forget </b> tag -->
<span class='star-ratings'>
<b:if cond='data:top.showStars'>
<div expr:g:background-color='data:backgroundColor' expr:g:text-color='data:textColor'
expr:g:url='data:post.absoluteUrl' g:height='42' g:type='RatingPanel' g:width='180'
/>
</b:if>
</span>
</b>

3.Find this line in your template and add following section of code just after this line
<b:include name='nextprev' />
<b:if cond='data:top.showStars'>
<script src='http://www.google.com/jsapi' type='text/javascript' />
<script type='text/javascript'>
google.load("annotations", "1");
function initialize() {
google.annotations.createAll();
google.annotations.fetch();
}
google.setOnLoadCallback(initialize);
</script>
</b:if>


4.you done! Now, after save template and try it.

2008/06/27

Blogger Draft Announce inline comment system

6/27/2008 08:58:00 PM Posted by Unknown 1 comment
2008/6/27 Blogger Draft 宣佈了新的意見系統,這也是Blogger最令人詬病的部分,文章的回覆的方法只有2種方式(Pop-up視窗與整頁模式)[1]。而這次更新終讓Blogger用戶可以將意見回覆直接嵌在文章的最下方。Step1
設定意見表單位置表示方式。先登入Blogger Draft,設定 > 意見 > 意見表單位置,此方式是使用iframe顯示回覆文章內容和名單及身份驗證選項。Step2
修改Blogger Template。版面配置 > 修改HTML > 點選展開小裝置範本(修改前記得先備份) ,尋找到<p class='comment-footer'>
<p class='comment-footer'>
<a expr:href='data:post.addCommentUrl' expr:onclick='data:post.addCommentOnclick'>
<data:postCommentMsg/>
</a>
</p>
修改為
<p class='comment-footer'>
<b:if cond='data:post.embedCommentForm'>
<b:include data='post' name='comment-form' />
<b:else/>
<b:if cond='data:post.allowComments'>
<a expr:href='data:post.addCommentUrl' expr:onclick='data:post.addCommentOnclick'>
<data:postCommentMsg/>
</a>
</b:if>
</b:if>
</p>
Step3
Enjoying!!

Ps.1在Blogger在還未宣佈此新功能之前(inline comment system),許多網友嘗試的找出將見意回覆系統嵌入單篇文章的下面。下面有幾則相關的文章,有興趣的人可以點進去看看