My studying notebook

Showing posts with label Demo. Show all posts

2009/01/08

Audio Player Wordpress Plugin Wizard

1/08/2009 10:57:00 PM Posted by Unknown , , , 1 comment
Google like Audio Player WordPress Plugin Wizard

Background:

In my another blog www.cage1016.blogspot.com. I wrote a post about a mobile answer tone 別別掛. The point is i found many audio(mp3) players that i can embed mp3 in my blog easily. Final, i found a post Inline Mp3 Player(WordPress version) and talk about a simple inline audio player. It's Audio Player Wordpress plugin. The audio player support you can setting simple options to change the look of palyer. for example: background color, Text color, enable auotplay and enable loop play.


<object id="audioplayer1" height="24" width="290" data="http://cage.chung.googlepages.com/player.swf" type="application/x-shockwave-flash">
<param value="http://cage.chung.googlepages.com/player.swf" name="movie"/>
<param value="playerID=2&bg=0xCDDFF3&leftbg=0x357DCE&lefticon=0xF2F2F2&rightbg=0xF06A51&rightbghover=0xAF2910&righticon=0xF2F2F2&righticonhover=0xFFFFFF&text=0x357DCE&slider=0x357DCE&track=0xFFFFFF&border=0xFFFFFF&loader=0xAF2910&soundFile=xxxx" name="FlashVars"/>
<param value="high" name="quality"/>
<param value="false" name="menu"/>
<param value="#FFFFFF" name="bgcolor"/>
</object>


Above code is the audio player plugin syntax. we can see that there are few options are relative to Color bg, leftbg etc. It's a little difficult to setting these color to product a beautiful look. Or if you don't real understand the html color hex code. I think that the best way is you can change the option color directly. And few ago, when i studied Google Static Map API. In button of Static Maps API Developer's Guide has a firendly wizard(Goolge Static Map Wizard) support a simple UI-dirven way to generate static maps via a simple UI interface.

So, i wirte some javascript to support a similar simple UI-dirven way to generate Audio Player Wordpress Plugin. Just 3 steps and few settings. You can get the beautiful audio player.

Explain:

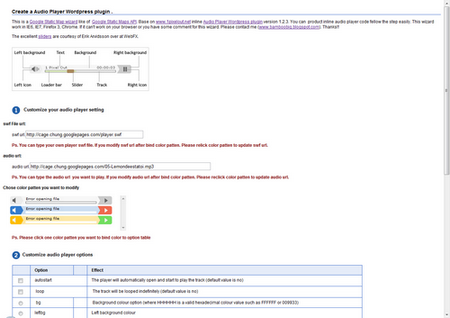
The Audio Player WordPress Plugin Wizard is Google style like. Build All by whole javascript and use excellent sliders are courtesy of Erik Arvidsson over at WebFX. The simple UI-dirven way let you can build your player look easily and only 3 steps.

Audio Player Color Schema:

As you can see. There are 9 color you can change.

Step1: Customize your audio player setting


First, you have 3 things to do. Choose the Audio Player Plugin play.swf url and choose the auido file url you want to embed in your blog (This 2 items have default, if you want test first and don't mind it). Then, there are 3 color schema patten. Choose one and you will see the colors bind to table of step2.

Step2: Customize audio player options of colors, autoplay and loop


After the color schema binded. I set autoplay and loop field are ture. If the player url and audio file url are current. Now you will listen to the music. In this step, you can change the color of palyer you want. Click the ratio button of option column. The color picker will be setting to equal the option color you click. You can change the color by darp the red, green and blue or type the html color hex code directly. The player will update if you any change the color, autoplay, loop setting and.

step3:Generate audio player embed code


Now, you can copy this code to embed in you blog.

enjoying~~~


2009/01/02

Feed media:thumbnail Item

1/02/2009 10:22:00 PM Posted by Unknown , 1 comment

In my early two posts(I,II). I talk about Blogger in Draft new features, the Geotagging. There are many blogger discuss the new feature in comments of New feature: Geotagging by Blogger In Draft. Now, maybe you don't understand that this post i will talk about feed item and why i will remind it.

If you had read the post of blogger draft new feature. You will notice that the author offer a Gagdet(here). It's add a google map in you blogger that parser feed georss:point data of your post feed. And i found Blogger Developers Network announced a feature about media:thumbnail(here). It's talk about you can get a 72x72 pixel image in your feed if you add first image in your post. Those give me a idea. I modify my blog template that just list the post if you click the older post link in the footer of blog.
<b:if cond='data:blog.pageType == &quot;index&quot;'>
<!-- Show article title only -->
<div class='thumbnail_'>
<table>
<tr>
<td>
<script expr:src='&quot;/feeds/posts/default/&quot; + data:post.id + &quot;?alt=json-in-script&amp;callback=GetThumbnail&quot;'
type='text/javascript'>
</script>
</td>
<td>
<h3 class='post-title' id='list-title'>
<a expr:href='data:post.url'>
<data:post.title/>
</a>
<h2 class='date-header'>
<data:post.dateHeader/>
</h2>
</h3>
</td>
</tr>
</table>
</div>
<b:else/>
<b:include data='post' name='post' />
</b:if>


function GetThumbnail(json) {
var url = (typeof(json.entry.media$thumbnail) != 'undefined') ? json.entry.media$thumbnail.url : &quot; & quot;
if (url.length & gt; 0) document.write('&lt;img src=\&quot;' + url + '\&quot;/&gt;');
else document.write('&lt;img src=&quot;https://blogger.googleusercontent.com/img/b/R29vZ2xl/AVvXsEhsPeUmlIKKTCkO4u4w42SdR4ph9rwh6IgI53ESBC232pBzD8nlNbOZdUk-P5KtJh73TLP_fRMU_HR3CIY-vNDYriqFSfX2un2HH-mKa_w-iChRdLCYoCU3n0rbEPcfOOHMPdyxMxIkQyc4/&quot; /&gt;');
}

The above code. javascript code pass one feed by pass data:post.id and execute callback functionGetThumbnail to write the image url.

get your blogger thumbnail←←


2008/07/02

Google AJAX Feed API - AJAX Slide Show Rolling

7/02/2008 07:00:00 PM Posted by Unknown , , , , , 4 comments
AJAX Slide Show 為利用Google AJAX Feed API作出來簡單的應用。允許使用者把 PhotoBucketFlickrPicasa Web Albums的網路相簿以幻燈片的方式嵌在自己的Blog、網站等中。在Slide Show 中Picasa Web Album Feed URL無法動態更改,利用Picasa Web Albums Data API 與 jQurey JSON的操作,即可完成Picasa Web Albums的輪播。


Live Demo
| Download


AJAX Slide Show
<script type="text/javascript">
function load() {
var samples = "http://dlc0421.googlepages.com/gfss.rss";
var options = {
displayTime: 2000,
transistionTime: 600,
linkTarget: google.feeds.LINK_TARGET_BLANK
};
new GFslideShow(samples, "slideshow", options);
}
google.load("feeds", "1");
google.setOnLoadCallback(load);
</script>

var samples 為載入相關的Rss,在Picasa Web Album中都可以訂閱任何一個相簿的Feed。例如訂閱第七屆拼圖馬拉松的Feed(http://picasaweb.google.com/data/feed/base/user/cage.chung/albumid
/5217479087123706369?kind=photo&alt=rss&hl=en_US
)即可將此相簿以Slide Show的方式展示在網頁中。


AJAX Slide Show Advance

scenario
上述的方式,Side Show相簿的Feed為固定的,如果想要展示不同的相簿就必需更改程式碼,這是一件滿煩麻的事情。即然Google公開了Picasa Web Albums Data API,所以我們應該可以使用API搜尋特定user的相簿,以亂數組出Slide Show所需的Feed,達到相簿輪播的效果。

待解決的問題:
  • 選擇Ablum Feed Url
  • 決定Picasa Web Albums Data API回傳資料的格式及接收方式
  • Parser回傳的資料,找出組出Feed最主的資料(Picase Web Album ID)
  • 將亂數選出的Ablum ID帶入AJAX Slide Show

Step1
我們可以要求幾種來自Picase Web Ablum的不同的Feed。依照我們的需求,是搜尋特定user所有公開的相簿,在Picasa Web Albums 搜尋的參數[1]中會使用到kind與access2種參數
  • Kinds指特定類別的參數(ablum、photo、comment、tag、user)在此使用, user
  • Access指定相簿屬性(all、public、private)在此指定user所有公開的相簿, publick
因此,我們Ablum Feed Url則為http://picasaweb.google.com/data/feed/api/user/userID?kind=kinds&Access=publick

Step2
由於 AJAX 程式中的 XMLHttpRequest 只能呼叫同一個 domain 下的 URL,所以呼叫遠端並回傳XML資料型態的資料會以安全性考量被拒絕存取。又因為Picasa Web Albums資料格式提供另一種輕量級的資料交換格式(JSON),只有在Feed Url中指定alt=json即可將XML資料格式轉換成JSON格式並回傳。

選定遠端資料回傳格式為JSON,剩下的就是本機端該如何接收JSON型態資料。在此使用了一個新形態的 JavaScript程式庫(jQuery),程式庫中可以直接使用 jQuery.getJSON( url, [data], [callback][2] 操作JSON並進行AJAX回呼。此時的Ablum Feed Url更改為http://picasaweb.google.com/data/feed/api/user/cage.chung?kind=album&access=public
&alt=json&callback=?


Step3
剩下的部份就是Parser回傳的JSON資料
var numentries = json.feed.entry.length; //每一個相簿都是單獨的entry,numentries則為相簿的數量
var rNum = Math.floor(Math.random() * numentries); //以Random選擇相簿
var item = json.feed.entry[rNum];

var title = item.title.$t; //相簿的標題
var summary = item.summary.$t; //相簿的說明
var id = item.gphoto$id.$t; //最主要的相簿ID


Step4
將亂數選出的Ablum ID帶入AJAX Slide Show var samples 字串中即可


整合之後的Script 如下
<script type="text/javascript">
function load() {
$.getJSON("http://picasaweb.google.com/data/feed/api/user/<span style="
font - weight: bold;
">USERID</span>?kind=album&access=public&alt=json&callback=?", function(json) {

var numentries = json.feed.entry.length;
var rNum = Math.floor(Math.random() * numentries);
var item = json.feed.entry[rNum];

var title = item.title.$t;
var summary = item.summary.$t;
var id = item.gphoto$id.$t;

if (summary.length > 0) $("#msg").html("<h4>" + title + "</h4><p>" + summary + "</p>");
else $("#msg").html("<h4>" + title + "</h4>");

var samples = "http://picasaweb.google.com/data/feed/api/user/<span style="
font - weight: bold;
">USERID</span>/albumid/" + id + "?kind=photo&alt=rss&hl=en_US";

var options = {
displayTime: 2000,
transistionTime: 600,
linkTarget: google.feeds.LINK_TARGET_BLANK,
scaleImages: true
};
new GFslideShow(samples, "slideshow", options);
});
}
google.load("feeds", "1");
google.setOnLoadCallback(load);
</script>


Reference
  1. Interacting with Picasa Web Albums
  2. you can load JSON data located on another domain if you specify a JSONP callback, which can be done like so: "myurl?callback=?". jQuery automatically replaces the ? with the correct method name to call, calling your specified callback. Or, if you set the dataType to "jsonp" a callback will be automatically added to your Ajax request.
  3. Projection values: Feed URL "api" 與 "base"的差別,api參數提供了gphoto相關元素(包括我們需要的album id)
base
api

2008/06/23

[Javascript & Css] CountDown

6/23/2008 09:30:00 PM Posted by Unknown , , 2 comments

google code jam 2008的首頁中,有一個斗大的CountDown,正在一秒一秒的倒數著報名截止的時間(07/16/2008 23:00:00 UTC)。看到這一個Counter就想起讀研究所的時候,幫老師帶大學部的助教,在作業上傳的頁面也作了一個CountDown,倒數著學生上傳最後的期限(每一次Reload時間才會改變),不過看起來的品質就沒有這一個的好,所以想說就試著分析一下。

最主要的部份為 Javascript + Css + DHTML 構成,主要由Javascript帶入DOM元素計算,並更新DOM元素CSS屬性來顯示不同時間。


Live Demo | Download

HTML
<span id="day0" class="num_0">0</span>
<span id="day1" class="num_0">0</span>
<!-- day -->
<span class="hp_counter_divider">:</span>
<span id="hour0" class="num_0">0</span>
<span id="hour1" class="num_0">0</span>
<!-- hour -->
<span class="hp_counter_divider">:</span>
<span id="min0" class="num_0">0</span>
<span id="min1" class="num_0">0</span>
<!-- minute -->
<span class="hp_counter_divider">:</span>
<span id="sec0" class="num_0">0</span>
<span id="sec1" class="num_0">0</span>
<!-- second -->

Javascript

<script type="text/javascript">
// create the countdown
new Countdown({
toDate: new Date(Date.parse("07/04/2008 23:00:00 UTC")),
dayElements: [el("day0"), el("day1")],
hourElements: [el("hour0"), el("hour1")],
minuteElements: [el("min0"), el("min1")],
secondElements: [el("sec0"), el("sec1")]
});
</script>

Countdown是在Javascript中使用了OO中封裝的技巧,在Countdown Function中定義了屬性(toDate, dayElement, hourElements, minuteElements, secondElements),上由el(var el = function(n) { return document.getElementById(n); })直接帶入DOM元素中相對應的值進行計算與更新CSS屬性

counter.js

function Countdown(config) {
this.toDate = config.toDate;
this.dayElements = config.dayElements;
this.hourElements = config.hourElements;
this.minuteElements = config.minuteElements;
this.secondElements = config.secondElements;
this.timer = undefined;

/**
* Updates the countdown display.
*/
this.update = function () {
var elapsed = (this.toDate.getTime() - (new Date()).getTime()) / 1000;
this.setDisplay(
this.age(elapsed, Countdown.DAY), this.age(elapsed, Countdown.HOUR), this.age(elapsed, Countdown.MINUTE), this.age(elapsed, Countdown.SECOND));
};

/**
* returns the age
*/
this.age = function (seconds, t) {
if (seconds <= 0) {
return[0, 0];
}
var s = ((Math.floor(seconds / t.unit)) % t.length).toString();
return (s.length < 2) ? ["0", s] : [s.substring(0, 1), s.substring(1, 2)];
};

/**
* Starts the countdown timer
*/
this.setDisplay = function (day, hour, minute, second) {
this.display(day, this.dayElements);
this.display(hour, this.hourElements);
this.display(minute, this.minuteElements);
this.display(second, this.secondElements);
};

/**
* Does the display
*/
this.display = function (num, els) {
els[0].innerHTML = num[0];
els[1].innerHTML = num[1];
els[0].className = "num_" + num[0];
els[1].className = "num_" + num[1];
};

// start timer
var that = this;
this.timer = setInterval(function () {
that.update()
},
250);
return;
}

/**
* some constants
*/
Countdown.DAY = {
unit: 86400,
length: 100000
};
Countdown.HOUR = {
unit: 3600,
length: 24
};
Countdown.MINUTE = {
unit: 60,
length: 60
};
Countdown.SECOND = {
unit: 1,
length: 60
};


counter.js中,一樣利用this.property封裝屬性、function()表示Method,計算出與截止時間的時間差,換算成 DD,HH,MM,SS 格式。在this.display中動態改變DOM元素值與CSS屬性


CSS

google code jam 2008的首頁CountDown中,Days,Hours,Mins,Secs皆是利用CSS background-position 屬性來顯示,在CSS中預先定義好0-9每個數字的background-position,在DOM元素改變CSS屬性時,即可套用CSS不同數字的背景圖

/* Number "0" */
#CounterCount span.num_0 {
background - position: 0px 4px;
}
/* Number "1" */
#CounterCount span.num_1 {
background - position: 0px - 21px;
}
/* Number "2" */
#CounterCount span.num_2 {
background - position: 0px - 46px;
}


ps. OOPS implementation in JavaScript可以參考Exploring OOPS - JavaScript Style serials by mastergaurav (code project)
ps. 07/16/2008 23:00:00 UTC, UTC(Coordinated Universal Time), 台灣為東8區,所以時間為UTC+8即可

2008/06/10

Dynamic Feed Control Wizard - Put feeds on Your Web Page

6/10/2008 10:09:00 AM Posted by Unknown , , , , 1 comment

Google 現在推出了讓使用者可以在自己的網頁中加上 dynamic RSS AJAX feeds。在Blogger Draft中新增了可以嵌入Feeds的小裝置,但是一次只能載入一個Feed。而在Dynamic Rss AJAX Feeds中可讓使用者一次載入多個Feeds而達到連播的效果,並提供3種樣式選擇(Vertical、Vertical Stacked、Horizontal):


再輸入完Feeds Expression(Feeds搜尋的條件),可以搜尋多筆,中間以","相隔開,按下Preview之後便會產生Dynamic Feed,Dynamic Feed 左側顯示為搜尋的關鍵字(可在產出的代碼中修改)


最後一個動作,Generate Code。


//Skip...
function LoadDynamicFeedControl() {
var feeds = [{
title: '竹誌',
url: 'http://cage1016.blogspot.com/feeds/posts/default'
},
{
title: 'bamboobig',
// 在此可自訂顯示的Feed
url: 'http://bamboobig.blogspot.com/feeds/posts/default'
}];
var options = {
stacked: true,
horizontal: false,
title: "Hollywood News"
}

new GFdynamicFeedControl(feeds, 'feed-control', options);
}
// Load the feeds API and set the onload callback.
google.load('feeds', '1');
google.setOnLoadCallback(LoadDynamicFeedControl);
//Skip...

LiveDemo (Event News)

2008/06/03

Css-Switcher

6/03/2008 09:46:00 PM Posted by Unknown , , 1 comment
利用Css可以快速改變HTML的風格樣式。在網頁中載入Css的方法則可以使用3種


<link rel="stylesheet" href="css/Clean.css" type="text/css">
<!--Method2: Embed Style-->
<style type="text/css">/*Css Code*/</style>
<!--Method3: Inline Sytle-->
<p style="color: red;">this is paragraph</p>


除了使用設計好的Css樣式之外,Javascript還可以讓我們動態的改變目前網頁中使用的樣式

<link rel="stylesheet" href="css/Clean.css" type="text/css">
<link rel="alternate stylesheet" href="css/Digg.css" type="text/css" title="Digg">
<link rel="alternate stylesheet" href="css/Flickr.css" type="text/css" title="Flickr">

Clean.css為預設網頁使用樣式,Digg.css & Flickr.css則為Javascript動態載入之樣式

function setActiveStyleSheet(title) {
var i, a, main;
for(i=0; (a = document.getElementsByTagName("link")[i]); i++) {
if(a.getAttribute("rel").indexOf("style") != -1 && a.getAttribute("title")) {
a.disabled = true;
if(a.getAttribute("title") == title) a.disabled = false;
}
}
}

function getActiveStyleSheet() {
var i, a;
for(i=0; (a = document.getElementsByTagName("link")[i]); i++) {
if(a.getAttribute("rel").indexOf("style") != -1 && a.getAttribute("title") && !a.disabled) return a.getAttribute("title");
}
return null;
}

function getPreferredStyleSheet() {
var i, a;
for(i=0; (a = document.getElementsByTagName("link")[i]); i++) {
if(a.getAttribute("rel").indexOf("style") != -1
&& a.getAttribute("rel").indexOf("alt") == -1
&& a.getAttribute("title")
) return a.getAttribute("title");
}
return null;
}

function createCookie(name,value,days) {
if (days) {
var date = new Date();
date.setTime(date.getTime()+(days*24*60*60*1000));
var expires = "; expires="+date.toGMTString();
}
else expires = "";
document.cookie = name+"="+value+expires+"; path=/";
}

function readCookie(name) {
var nameEQ = name + "=";
var ca = document.cookie.split(';');
for(var i=0;i < c =" ca[i];" c =" c.substring(1,c.length);" onload =" function(e)" cookie =" readCookie(" title =" cookie" onunload =" function(e)" title =" getActiveStyleSheet();" cookie =" readCookie(" title =" cookie">

在頁面中簡單的使用Hyperlink,將Css link中Title的參數指向Javascript中的setActiveStyleSheet Function

<a href="#" onclick="setActiveStyleSheet(''); return false;">預設載入的樣式</a>
<a href="#" onclick="setActiveStyleSheet('Digg'); return false;">動態載入Digg樣式</a>
<a href="#" onclick="setActiveStyleSheet('Flickr'); return false;">動態載入Flickr樣式</a>


Live Demo
